15 Nov

The Easy Way to Create a 1/2 Scale Pattern

How to Resize a Pattern to 1/2 (or 1/4) Size

(by Tanya Cunningham — Please use attribution if you share this document.)

When using a machine knitting accessory for shaping a garment (eg KnitLeader, KnitRadar, etc), sometimes you need a pattern that is scaled from full size to 1/2 or 1/4 size. This tutorial will show you a very simple way to create a scaled pattern.

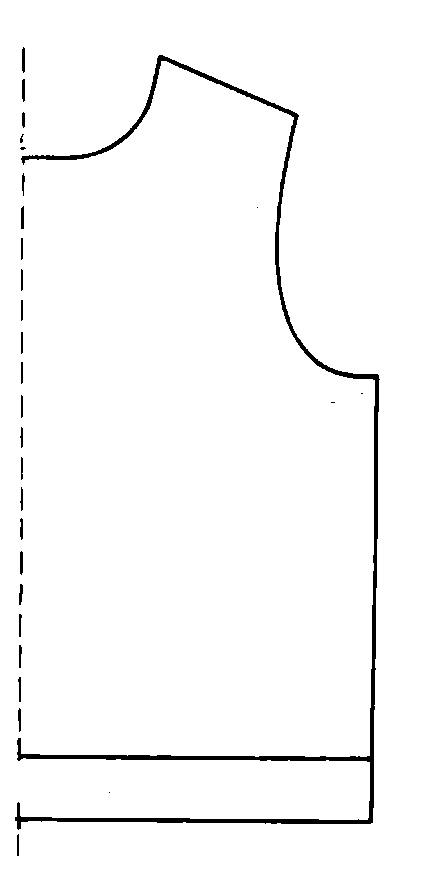
Your pattern may be one obtained by tracing an existing garment that you know is a good fit, or it may be a sewing pattern designed for stretch knits, or it may be a diagram obtained from a published knitting pattern.* Assuming your pattern piece is symmetrical, fold or cut in half vertically. You will work with only one half of the pattern. This method may not work with especially large, or asymmetrical pieces.

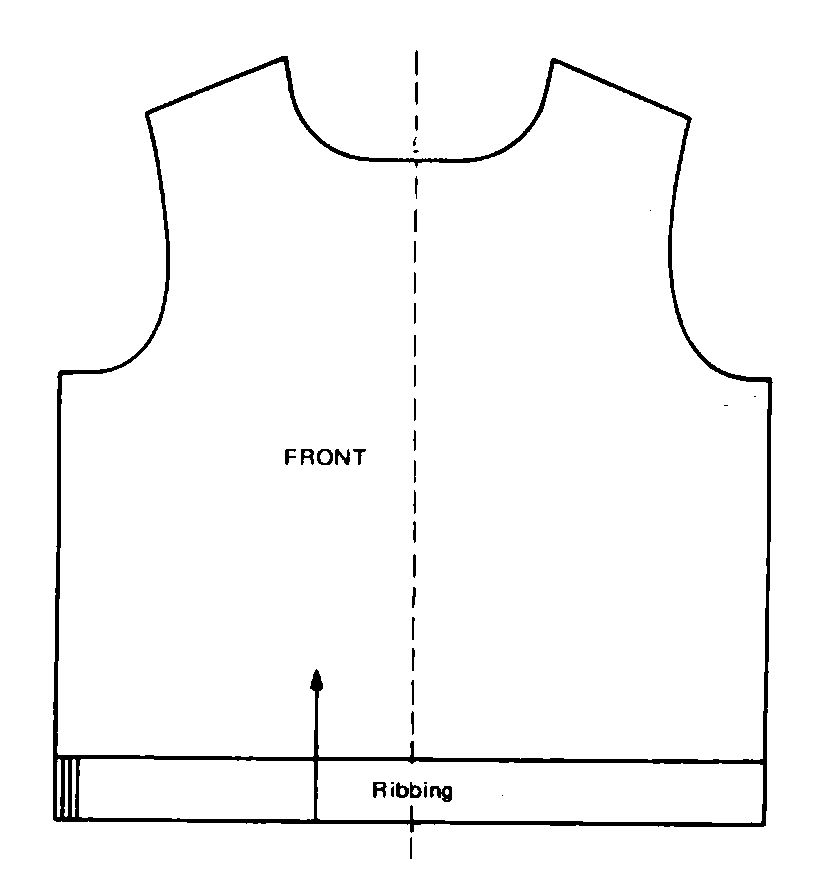
Sample of typical front pattern piece

Work with just half of the pattern

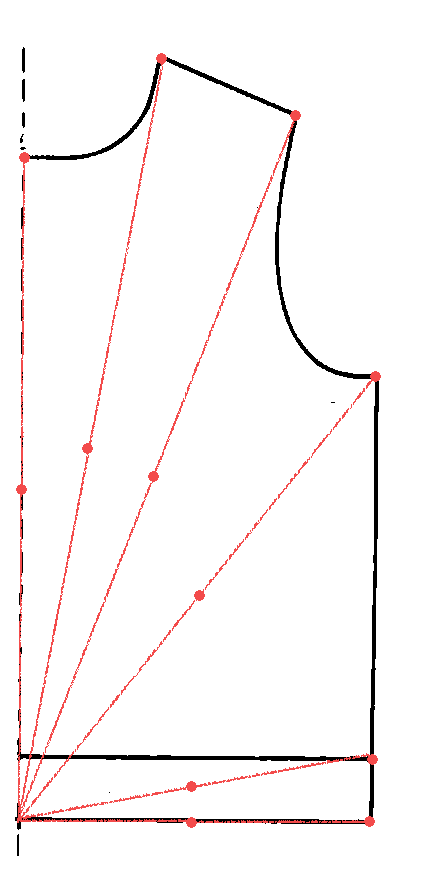
Once you have your pattern divided, take a long straight edge and draw a straight line from each point where the outline changes direction to one central point. Usually the easiest central point to use is the point where the bottom edge meets the middle, vertical line. Draw a line from each of the outer points to that central point.

Now, measure each line, and locate the center, halfway point and mark it. (NOTE: If you are reducing to 1/4 size, divide the length of each line by 4, and mark 1/4 distance from the center point at the bottom edge.)

Lines drawn from each point to central point, marks at halfway.

Finally, connect the half-way marks, using straight, or curved lines to match the larger pattern.

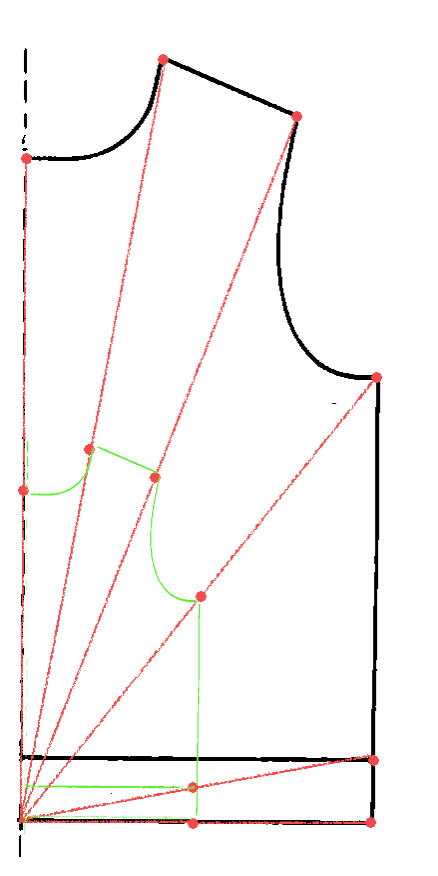
The green outline is your 1/2 scale pattern piece (1/4 scale would be even smaller.)

* A great source of knitting pattern diagrams are the free patterns found at the Garn Sudio website, www.garnstudio.com.

©2020 Tanya Cunningham/Fridamar Textiles — For personal use only

27 Nov

60 Stitch Images

I’ve putting together a collection of images that are 60 or fewer stitches wide, that can be used with the free version of img2track. I may add to this collection from time to time.

These images are all ready to load and knit, however, some of them are not optimal for single bed, fair isle knitting, as they have large blocks of color, which means that the finished fabric will have long floats and laddering. Images of that type are probably better suited to DBJ.

Click HERE to download a file containing the images.

15 Sep

Fermented Foods – Part 2

My previous post left us all wondering whether I would eventually get to kraut.  Here’s the update.

After finding a better tool, and a lot more serious smashing, the whole mess compacted down to this:


After getting it ito quart jars (that whole batch fit into three jars!), I found that the handle of my krumkake roller made a great smasher.

And, lo and behold, after filling the jar and smashing it down, I had juice!

I was prepared to make extra brine to cover the cabbage, but didn’t need to.

I pushed everything down with my fingers and weighted the top with baggies of water. I put the lids on, loosely, and put the jars into containers, in case of any overflow. They’re now tucked away in a corner of the kitchen. Just waiting for them to do their private magic.

15 Sep

New Cooking Adventure – Fermented Foods

IMG_0341

I’ve tried a lot of different things when it comes to food and cooking, but one thing that’s been on my list for a very long time is fermented foods. After ending up with 2 enormous, beautiful heads of cabbage from my CSA, Vermont Valley Community Farms, I decided that now is the time to try Mason Jar sauerkraut.

I adore cabbage (and all of the brassicas), so I figured I can’t go too far wrong with this. And what could be more simple than cabbage + salt + time? Well, let’s see . . .

I decided in favor of chop rather than shred. Personal preference, I don ‘t generally enjoy stringy foods – too messy.

Hah! I though I’d only fill this huge pot about 1/4 full.

IMG_0342


All chopped, over 3/4 full. . . at least for now.

IMG_0344


Now the salt. I used Kosher, hope that’s OK. It’s not particularly fine, as many of the recipes called for. Ratio should be 1 Tbsp per “medium” head of cabbage. I think mine were bigger than medium, so I’m putting in 2.5 Tbsp.

IMG_0345


I guess hands are not the best tool for squishing the cabbage. I came away with quite a lot of salt on my hand. I had to replace that. I’ll use something else as a smasher. Now to let it “rest” for a while.


IMG_0346

After letting it rest, salted, for about :20, mashing with the potato masher – hard! – for about :10, where’s the ‘pool of cabbage juice’ that’s supposed to appear? Maybe this is one where I should wash my feet and stomp on it?

IMG_0347

Watch this space. . .


14 Jul

Come Join Me at the Finger Lakes Machine Knitting Seminar

I am so excited and honored to be a presenter at the 2017 Finger Lakes Machine Knitting Seminar on Sept 28th and 29th. (Click here for seminar info.) I would LOVE to meet some of you there. Over the course of 2 days I will be giving 8 workshops, with an emphasis on img2track for electronic machines, but also some fun sessions that will apply to any machine. Here is a list of my workshops:
 
1. Tips for Knitting a King-sized Photo Blanket — Many of you have seen some of the truly amazing blankets that have been created using img2track. I will talk about and demonstrate some techniques to use in creating image files for this process. How to split an image in to 2 or more segments, and construction techniques. I use GIMP on a Mac, but the processes will be similar in many graphics programs. (Single bed or Double bed)
 
2. Tips and Tricks for Optimizing Graphic Images for Knitting – This will be a computer-based workshop. I will be demonstrating many ways of manipulating an image to optimize it for knitting. Mostly I want to encourage you to dig into your graphics program (whichever one you like using) and explore and experiment to find ways of altering images for knitting.
 
3. Img2track – More Than Just Fair Isle – Explore some of the ways in which you can let your creativity and imagination loose with lace, tuck and slip
 
4. Bubble Pops Shawl – This easy and additcitvely fun stitch pattern uses the ribber and a drop stitch technique. You’ll wonder why you waited so long to try it. (Double Bed) AND Crochet On The Knitting Machine? – Learn how to create this unusual and beautiful open stitch pattern that you’ll swear is crocheted when you’re done. (Single Bed)
 
5. Knitting Outside The Box: Creating a True Linen Stitch – A true linen stitch is one of those very elusive techniques for the knitting machine. Because it involves slipping/passing yarn on the knit side, it involves hand manipulation. I will discuss how I’ve developed a tool that facilitates this technique and demonstrate its use. (Single Bed)
 
6. Single-bed Plaid Without Floats — Using intarsia and manual needle selection, you can create a plaid that mimics the look of a woven fabric. (Single Bed, Intarsia)
 
7. Creating Filet Lace Motifs with img2track – In this workshop we will USE computer graphics and img2track to create and then knit filet-style lace motifs, using the lace carriage. (Single Bed, Lace Carriage)
 
8. DBJ – 3-6 colors per row – Using img2track and computer graphics, we will explore how to maximize an image for knitting in Double Bed Jacquard with more than 2 colors. (Double Bed)